How to Upgrade Your Pantry in 7 Easy Steps (Step-by-Step Tutorial)
What’s up family?! Dave here! This week has been crazy for me — whew! So many things going on in the kitchen, so many things to still finish, but TODAY! I said, “TODAY!” We are going to tackle the dreaded kitchen pantry. I mean damn! This was a scary pantry y’all. It had that slightly haunted vibe to it, ya know? That vibe that makes you want to sage the entire house after you have to step foot inside. ¡Es no bueno! Now, we’ll finally be able to fix it up a little bit aesthetically and at the same time, add some functionality and an organizational element to it.
We’ve been extremely busy this week. While working on multiple small projects in the kitchen we’ve also been cooking and trying to function in there. Honestly, I had no interest in putting our food in this pantry before the makeover. I know I’m being slightly dramatic but still, those feelings are exactly what motivated us to tackle this project pretty early in our DIY home renovation process.
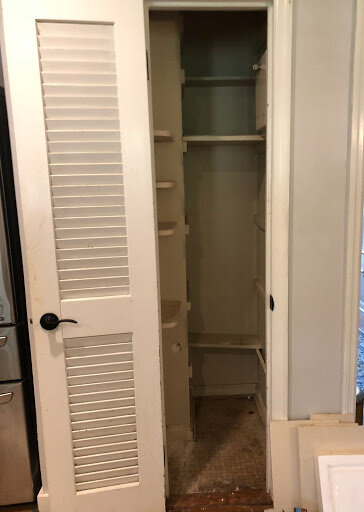
The Original Pantry Headaches
There were a lot of problematic components to this pantry. The shelves were crooked, some weren’t wide enough and would fall pretty regularly they were basically — useless. The pantry even had poor lighting. How can you utilize a pantry when you can’t see what you are looking for?! If you look closely you’ll see a box for an old alarm system that was big, cumbersome and really took a lot of space away from an area that didn’t have much space to begin with. The walls were littered with holes, even more so after we took out the shelves and that alarm system. Buried Underneath three or four layers of linoleum tile, there was what looked like ceramic tile flooring that was extremely worn, dirty, and dated.
Our Pantry Solution Game Plan
Install a better pantry shelving system
Add some much-needed pantry lighting
Remove the tacky, old alarm system that we couldn’t use since we bought the Ring doorbell and cameras
Patch up the holes and paint the walls of the pantry
And last but definitely not least, we knew had to do something about that floor.
Basically, everything in the original pantry HAD TO GO!
Before we jump into how we implemented our list of solutions, here are
4 Key Tips For Your Own DIY Pantry Renovation Project
Plan Plan Plan: tThis is fundamental when starting any renovation project. Jot down a few questions based on what’s important to you for your DIY pantry organization. Trust me, this step will save you a lot of time and energy in the long run! A few we asked ourselves were:
Where will the canned goods going to go?
Do the shelves have enough space between them?
What are all the items that should be stored in the pantry?
Measure your shelves: This may seem like an obvious tip but it’s a step that is often eyeballed or even completely skipped.
Invest in a level: They are cheap and effective and I think they even have an app for them now. If you’re a tech-lover, a level app might be the way to go but personally, I’d still go with the traditional analog level instead to ensure accuracy.
Use clear containers: Most people don’t like their pantry to look like an aisle at the grocery store with labels everywhere. It makes the pantry appear more cluttered than it may actually be. By putting your powders and cereals and other pantry staples in clear containers, it creates a much more seamless, cohesive aesthetic.
Step-by-Step DIY Pantry Tutorial
First, we removed the broken shelves and patched all holes left in the walls. Normally, we like to keep wood around and reuse it for other projects but in this case, the wood was useless so we threw it out.
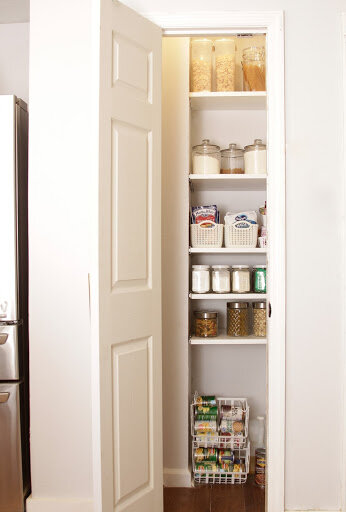
Next, we painted the walls to match the rest of the kitchen which brought some much-needed uniformity to the space. It also brightened up the pantry since the original paint was faded and dingy. This also helped some with the lighting issue.
We measured and cut the shelves. Always make sure to measure two or three times before cutting anything because as you know, there’s no point in cutting wrong and wasting material.
We then installed our new pull-out shelving creating easier access since our pantry is narrow and deep. We wanted to make sure it would be easy to reach the back of the shelves for any reason, if necessary.
We hung a new door. Honestly ,the old one was perfectly fine from a functional standpoint but we wanted a different look to match our more modern farmhouse decor style so we swapped it out.
We replaced the floor because like I said earlier, we wanted a simple modern look so we laid linoleum hardwood panels down over the original tile. The pantry flooring now looks a lot better and was way cheaper than all of the other alternatives.
The last step was organizing the pantry. We bought cereal containers and other clear containers for our pantry staples like flour, sugar, brown sugar and breadcrumbs.
Lastly, we could finally enjoy that shit! Every remodeling project has a cost whether it’s your time and energy, your hard-earned money or most often, BOTH. So when you too have finally completed this DIY pantry update tutorial, pat yourself on the back and enjoy the small victory you have just achieved. There will always be more to work on and around your home and if you only focus on what you have left to do, it can easily overwhelm you. Take it one day at a time, one project at a time and you’ll be fine!
Was this Step-by-Step DIY Pantry Upgrade Tutorial helpful? What did you do differently? We’d love to see how it turned out!
Tag us in your Instagram creations for a chance to be featured in our insta stories! Use @project1826 and the hashtag #project1826.